Introduction
Welcome to this beginner-friendly guide to Solana programs — the engine behind some of the fastest and most cost-efficient decentralized applications in the blockchain ecosystem.
Whether you’re new to Solana or transitioning from other blockchain platforms, this tutorial is designed to help you start building quickly and confidently. You’ll learn what makes Solana programs unique, how they take advantage of the network’s high-performance architecture, and why more developers are choosing Solana for their next-generation applications. Most importantly, you’ll gain hands-on experience by building, deploying, and interacting with your own on-chain program.
To make your development journey smoother, we’ll use the Anchor framework — a developer-friendly toolkit that abstracts away much of the boilerplate and complexity. With Anchor, you can focus on writing clear, secure logic instead of getting bogged down in low-level details.
Why Solana?
Speed and affordability. While many blockchains face limitations from slow transaction times and high fees, Solana processes thousands of transactions per second at a fraction of the cost. This performance edge has made it a top choice for DeFi protocols, NFT platforms, and real-time applications like games.
At the core of every Solana application are programs — efficient, purpose-driven code that defines how your app behaves on-chain. By the end of this tutorial, you’ll have a solid understanding of how these programs work and the confidence to build and deploy your own using modern tools and best practices.
Let’s dive in and start building the future of decentralized applications.
What is a Program?
In Solana, a program is a piece of on-chain logic — similar to a smart contract in the Ethereum world — that gets deployed to the blockchain. While programs can be written in various languages including C and C++, Rust is the preferred and most widely adopted language due to its performance, memory safety, and excellent tooling support. However, Solana takes a fundamentally different approach to organizing code and data compared to other blockchains. Unlike Ethereum, which stores both logic and data together within smart contracts, Solana uses a stateless model that separates these concerns. In this architecture, programs contain only the executable logic, while all data (or state) is stored separately in dedicated accounts. Programs interact with this data by reading from and writing to accounts during execution, but they never store data internally.
While Ethereum stores both logic and data together in smart contracts, Solana uses a stateless model. This means that the program only contains logic, while the data (or state) is stored separately in accounts. The program reads from and writes to these accounts, but it doesn’t store any data itself.
This design brings several key benefits:
- Scalability: Stateless programs make it easier to process many transactions at once, improving performance.
- Flexibility: The same program can work with different sets of data by interacting with various accounts.
- Efficiency: Separating logic and data reduces redundancy and improves resource management.
In summary, programs are the foundation of Solana’s fast and efficient blockchain. They power everything from simple transactions to complex DeFi protocols, making them essential to the Solana ecosystem.
Solana Account Types
Solana’s account model encompasses several distinct account types, each serving specific purposes within the blockchain ecosystem. Understanding these types is crucial for effective Anchor program development.
Core Account Types
- Regular Data Accounts Standard accounts that serve as the primary storage mechanism for program state and user data. These accounts hold arbitrary data structures and can be owned by any program, making them the foundation for most decentralized application logic.
- Program Derived Addresses (PDAs) Specialized accounts generated deterministically from a combination of seeds and a program ID. PDAs enable programs to own accounts without requiring private keys, providing a secure method for programs to manage state and create predictable account addresses that can be derived off-chain.
- Signer Accounts Accounts that represent transaction signers, providing cryptographic proof of authorization. These accounts ensure that only authorized parties can execute specific instructions, forming the cornerstone of Solana’s security model by validating transaction authenticity.
- System Program Accounts Essential accounts managed by Solana’s built-in System Program, which handles fundamental blockchain operations including account creation, lamport transfers, and account ownership changes. These accounts are required for basic blockchain functionality and serve as the foundation for all other account operations.
Each account type plays a distinct role in Solana’s architecture, with Anchor providing specialized types and constraints to work seamlessly with these different account categories while maintaining security and developer ergonomics.
Solana Accounts in Anchor Programs
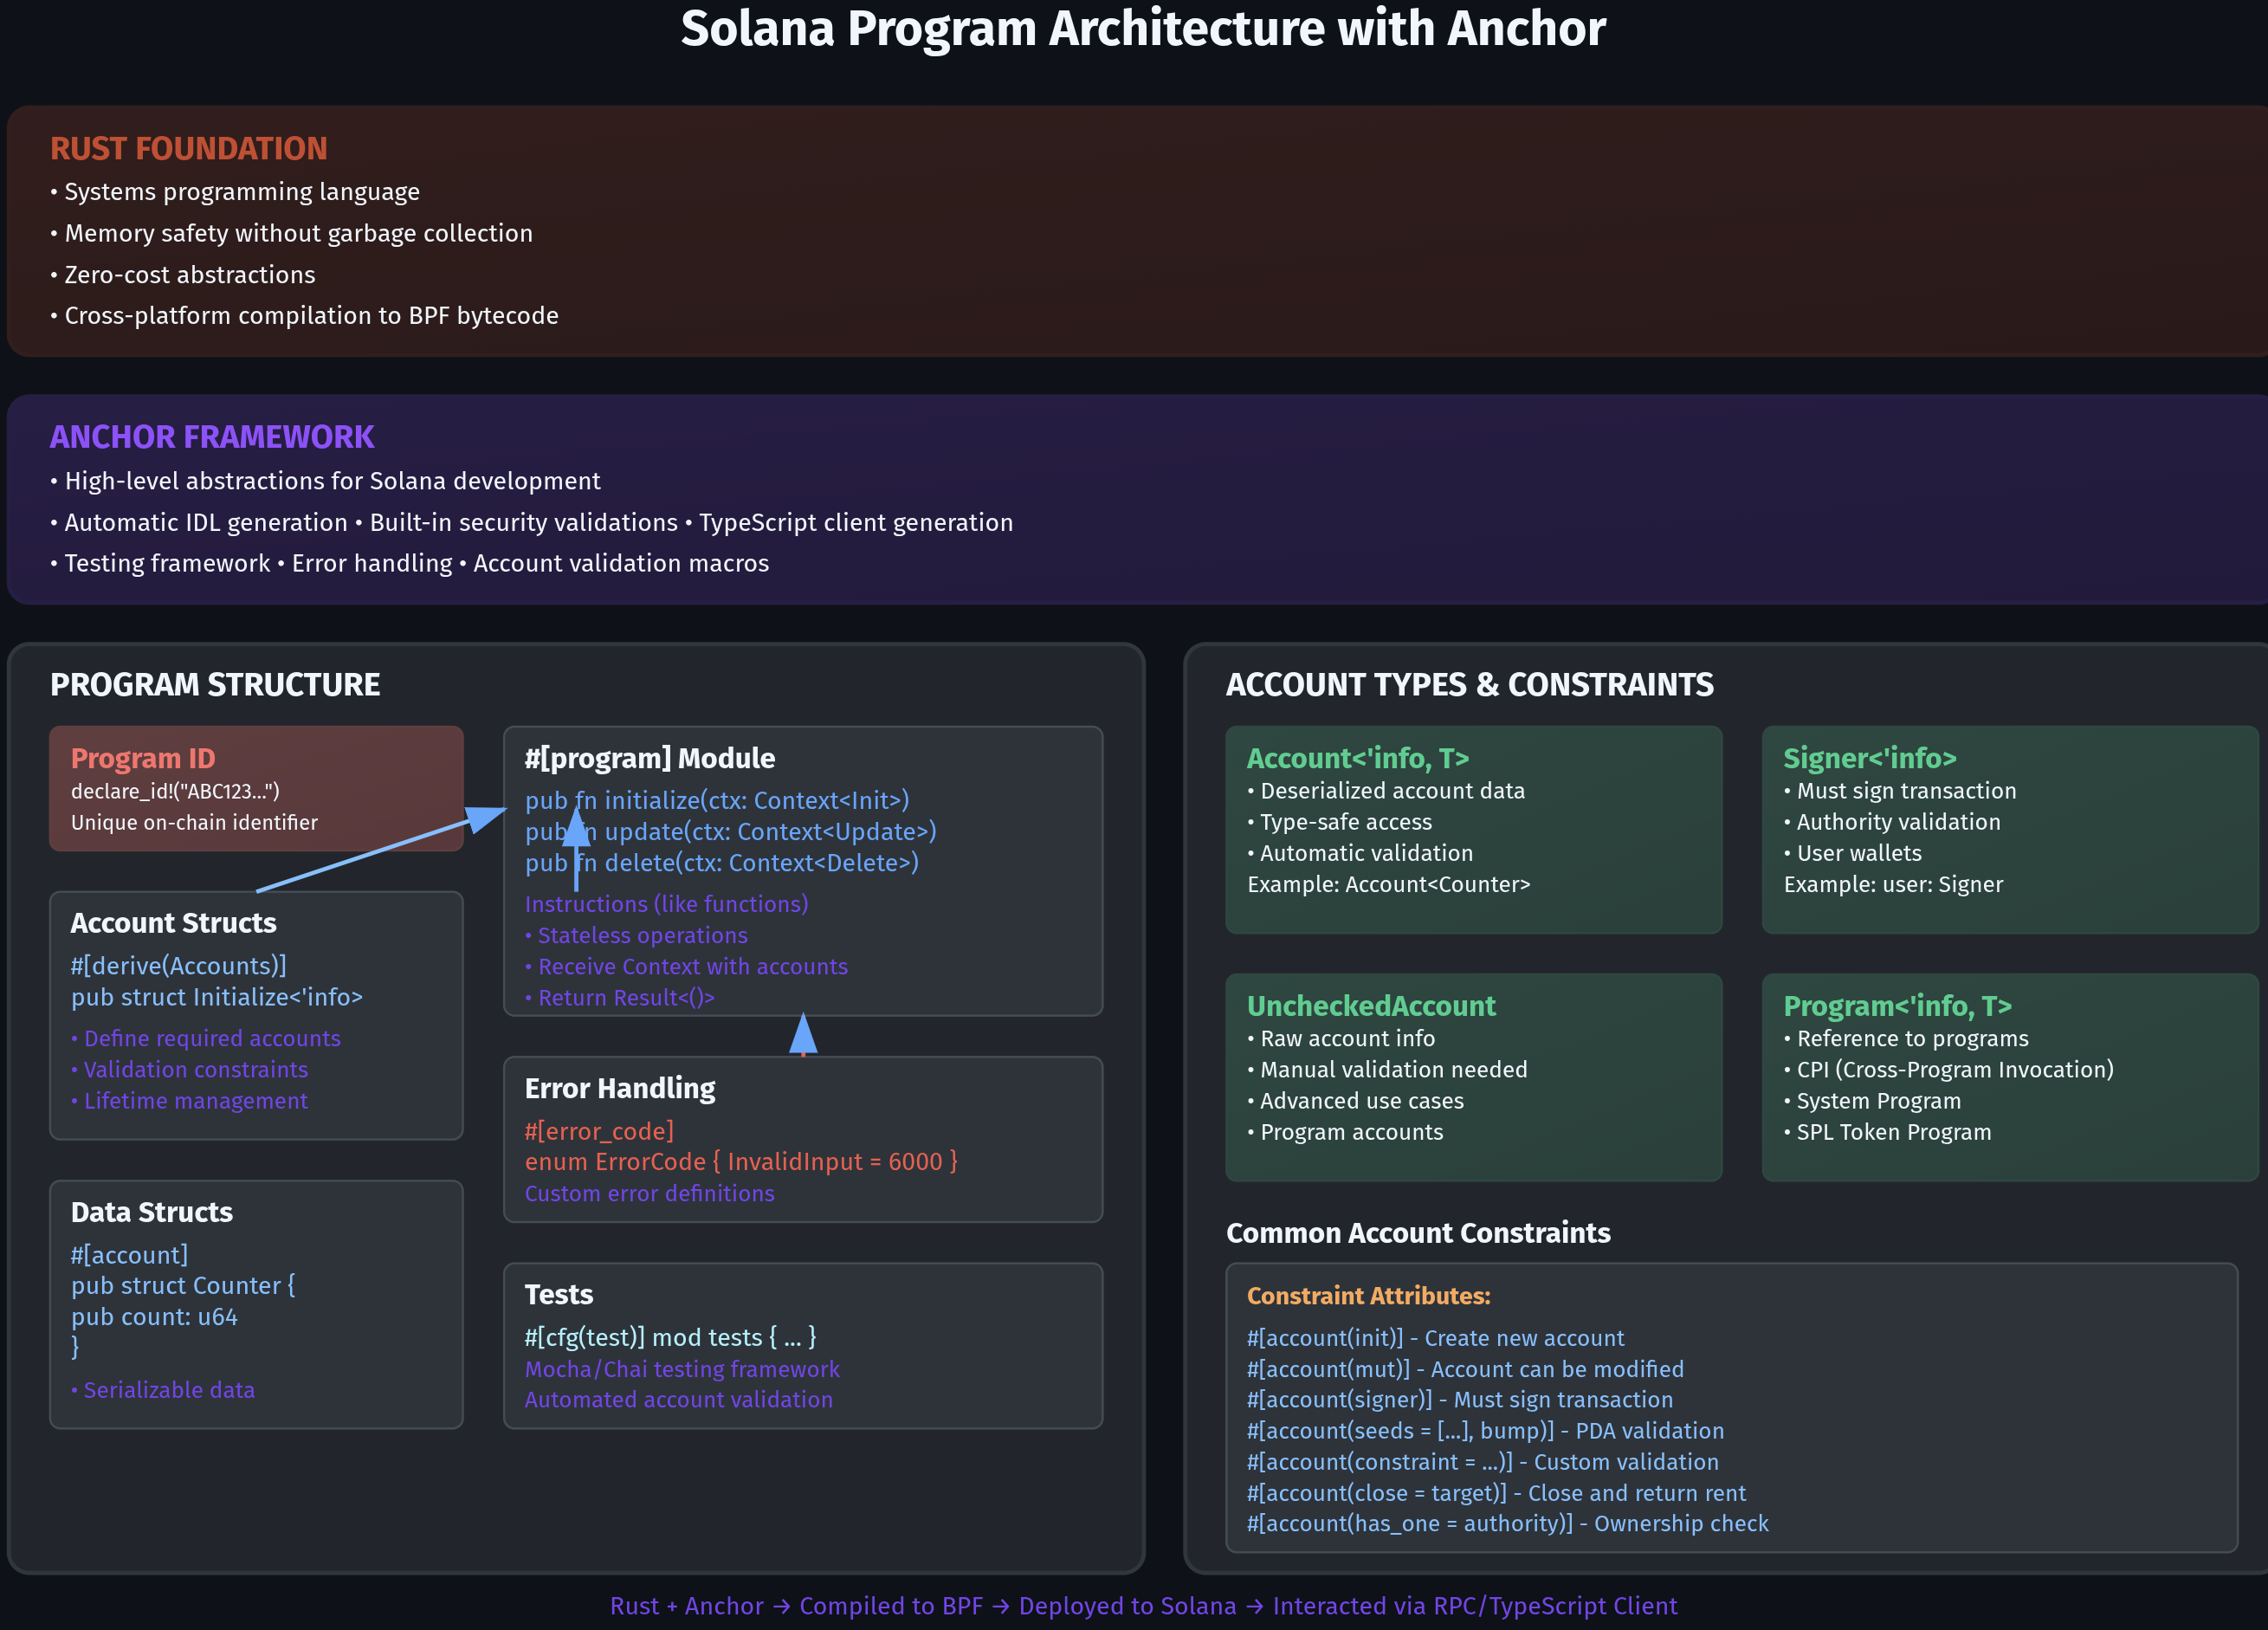
In the context of an Anchor program on Solana, the Accounts struct plays a central role in defining which accounts an instruction expects and the constraints they must adhere to. This struct acts as a declarative interface between the program and the Solana runtime, simplifying both account validation and access while leveraging Rust’s type system to ensure security and efficiency.
Key Components of the Accounts Struct
Account Types with Automatic Validation Anchor provides built-in types like
Account, Signer, andProgramthat automatically perform deserialization and enforce safety checks, significantly reducing boilerplate code and preventing runtime errors.Flexible Unchecked Options For advanced use cases requiring manual control, types like
UncheckedAccountandAccountInfobypass automatic checks, placing the responsibility for validation entirely on the developer.Declarative Constraints Anchor supports powerful constraint annotations such as
#[account(mut)]for mutable accounts or#[account(seeds = [...], bump)]for program-derived addresses, allowing developers to enforce custom security rules directly in the struct definition.Dual Validation System The combination of types and constraints creates a comprehensive validation framework that handles both common patterns automatically and custom requirements declaratively.
This dual system of types and constraints makes Anchor exceptionally powerful for building secure, readable, and efficient Solana programs, as it transforms complex account management into clear, declarative code.
Building a Simple Vault Program on Solana
In this tutorial, I’ll walk you through building a Vault program — a simple yet powerful example that shows how to manage on-chain data using the Anchor framework on Solana.
Think of this Vault as your personal digital safe on the blockchain. It allows a user to initialize a vault tied to their wallet and deposit tokens (represented as numerical values for simplicity) into it. While basic, this program introduces key concepts like account validation, program-derived addresses (PDAs), and custom state management — all essential for building real-world decentralized applications (dApps) on Solana.
This project is a great starting point because it demonstrates how to:
- Use Anchor to define and initialize program accounts
- Store and update user-specific data securely
- Work with PDAs to uniquely identify user vaults
- Understand how Solana’s account model separates logic (program) from data (accounts)
By the end of this section, you’ll not only understand how the Vault works — you’ll have hands-on experience with foundational patterns used across the Solana ecosystem. Whether you’re dreaming of building a DeFi platform, a game, or a data vault app, this example gives you the building blocks to get started.
Set Up Your Environment
Before writing and deploying Solana programs, you’ll need to install a few essential tools: Rust, Anchor, and the Solana CLI. You can find the official installation guide on the Solana Documentation website.
Once everything is installed, you can initialize your Anchor workspace by running the following command in your terminal:
anchor init vault_program
This will create a new project directory named vault_program with the following structure:
tree -L 1
vault_program
├── Anchor.toml # Anchor project configuration
├── app         # Frontend (if needed)
├── Cargo.lock
├── Cargo.toml  # Rust project config
├── migrations  # Deployment scripts
├── node_modules
├── NOTES.md
├── package.json
├── programs    # Contains your Solana program code
│ └── vault_program
│ └── src
│ └── lib.rs    # Main program file
├── target
├── tests       # Anchor tests
├── tsconfig.json
└── yarn.lock
Open the project in your favorite IDE. I use Visual Studio Code for its excellent Rust and Anchor plugin support. Navigate to the main program logic in:
programs/vault_program/src/lib.rs
Exploring the Vault Program Code
Now that the environment is ready, let’s break down the actual Anchor program logic. This simple Vault program has two core functionalities: initializing a vault and depositing funds into it. Below is a section-by-section explanation of what each part of the code does.
1. Importing Dependencies
use anchor_lang::prelude::*;
This line imports the Anchor framework’s prelude, which includes all the necessary macros, traits, and types to build Solana programs efficiently.
2. Declaring the Program ID
// Declare the program ID - this is a unique identifier for your program on Solana
declare_id!("4qriKCvK2e9NTGhmFXwrXGUFPZuimkChFE265QY45c61");
Every Solana program is identified by a unique Program ID, which acts as its address on the blockchain. This ID is essential for locating and interacting with the program once it’s deployed. In your code, the declare_id! macro sets this identifier.
One special Program ID to note is 11111111111111111111111111111111, which belongs to Solana’s System Program — a core, built-in program that handles account creation and transfers. Since all on-chain data is stored in accounts, the System Program is fundamental to how Solana operates.
3. Main Program Logic
#[program]
pub mod vault_program {
    use super::*;

    // Function to initialize a new vault account
    // Creates a new account to store user's funds
    pub fn initialize_vault(ctx: Context<InitializeVault>, bump: u8) -> Result<()> {
        let vault = &mut ctx.accounts.vault;
        vault.authority = ctx.accounts.user.key();  // Set vault owner
        vault.bump = bump;                         // Store bump for PDA validation
        vault.balance = 0;                         // Initialize balance to zero
        Ok(())
    }

    // Function to deposit funds into the vault
    // Adds the specified amount to the vault's balance
    pub fn deposit(ctx: Context<Deposit>, amount: u64) -> Result<()> {
        let vault = &mut ctx.accounts.vault;
        vault.balance += amount;  // Add deposited amount to balance
        Ok(())
    }
}
This is where the core functionality lives:
initialize_vault: Creates a new vault account linked to the user. Sets the authority, bump (used for PDA validation), and starts with a zero balance.deposit: Adds the specified amount to the vault’s current balance.
4. Vault Account Structure
Understanding #[account]
In Anchor, the #[account] attribute is used to mark a struct as an on-chain account, meaning its data will be stored and managed on the Solana blockchain. This macro tells the Anchor framework how to serialize, deserialize, and interact with the struct’s data.
For example, the Vault struct in this program is decorated with #[account], making it an account type that stores state like authority, balance, and bump. Anchor automatically handles reading from and writing to this account during program execution, which simplifies development and reduces boilerplate code.
// Define the Vault account structure
// This struct represents the data stored on-chain
#[account]
#[derive(Default)]
pub struct Vault {
    pub authority: Pubkey,  // Owner of the vault
    pub balance: u64,       // Current balance in lamports
    pub bump: u8,           // Bump seed for PDA derivation
}
This struct defines the on-chain data stored for each vault. It includes:
authority: The public key of the user who owns the vault.balance: The current stored amount (in lamports).bump: Used to recreate the PDA (Program Derived Address) securely.
5.InitializeVault Context
// Account validation for vault initialization
#[derive(Accounts)]
#[instruction(bump: u8)]
pub struct InitializeVault<'info> {
    #[account(
        init,           // Initialize new account
        payer = user,   // User pays for account creation
        space = 8 + 32 + 8 + 1,  // Space: discriminator + pubkey + u64 + u8
        seeds = [b"vault", user.key().as_ref()],  // PDA seeds
        bump
    )]
    pub vault: Account<'info, Vault>,

    #[account(mut)]
    pub user: Signer<'info>,  // User must sign the transaction

    pub system_program: Program<'info, System>,  // Required for account creation
}
This context validates accounts for the initialize_vault function:
- Initializes a new vault using a Program Derived Address.
- The user pays for the account creation.
- The
spacefield calculates how much storage to allocate on-chain. - The
bumpensures the PDA can be securely recreated.
6. Deposit Context
/ Account validation for deposits
#[derive(Accounts)]
pub struct Deposit<'info> {
    #[account(
        mut,
        seeds = [b"vault", user.key().as_ref()],
        bump = vault.bump
    )]
    pub vault: Account<'info, Vault>,

    #[account(mut)]
    pub user: Signer<'info>,  // User must sign the transaction
}
This context is used when a user deposits funds:
- Validates that the vault belongs to the user and matches the PDA.
- Ensures both the vault and user accounts can be modified.
7. Build and Deploy the Vault Program
With your program code ready, it’s time to compile and deploy it to the Solana blockchain using Anchor’s CLI tools.
To build the program, run:
anchor build
This command compiles your Rust code and its dependencies, creating the program binary (.so file) and an IDL (Interface Definition Language) file used to interact with the program. You’ll find the build output in the target/deploy/ and target/idl/ directories. If you haven’t already specified a program ID, Anchor will generate a new keypair and assign it to your program.
Next, deploy the program to the blockchain using:
anchor deploy
This uploads the program to the currently selected Solana cluster (default is localnet) and links it to the ID declared in your code via declare_id!.
To deploy to a different cluster like Devnet, run:
anchor deploy --provider.cluster devnet

anchor deploy --provider.cluster localnet                 ✭
Deploying cluster: http://127.0.0.1:8899
Upgrade authority: /home/tony/.config/solana/id.json
Deploying program "vault_program"...
Program path: /library/dev/solana/anchor/blog/vault_program/target/deploy/vault_program.so...
Program Id: 4qriKCvK2e9NTGhmFXwrXGUFPZuimkChFE265QY45c61

Signature: 3ncvsJyFC1cuG3oaPWeim9Ys75J3Kh44Jn9Dadg4nKwxQjurhRtrLQ3XoB6YYyq5egk1PJhpC8zNxbkjTVEAvG57

Deploy success
Once deployed, you can confirm the program is live with:
solana program show 4qriKCvK2e9NTGhmFXwrXGUFPZuimkChFE265QY45c61

Program Id: 4qriKCvK2e9NTGhmFXwrXGUFPZuimkChFE265QY45c61
Owner: BPFLoaderUpgradeab1e11111111111111111111111
ProgramData Address: EDxfwqjeQjtrCVziwkGUjMTueKFnBywsucV2q1YyBpC5
Authority: Gr1RhjAAfsV2nsta9rfT8aukJB2CzEgVFqanzx8JX6ww
Last Deployed In Slot: 247676
Data Length: 198672 (0x30810) bytes
Balance: 1.3839612 SOL
This command is a great way to verify your deployment, check who controls the program, and monitor its status on-chain.
Program Id: The unique address of your deployed program on the Solana network.Owner: The loader responsible for executing the program — in this case, it’sBPFLoaderUpgradeab1e..., meaning the program is upgradeable.ProgramData Address: A system-managed account that stores the actual compiled program data. It’s used to separate executable code from metadata.Authority:The wallet address that has permission to upgrade the program (if upgradeable). This should match the keypair you deployed with.Last Deployed In Slot: Indicates when (in terms of Solana’s slot number) the program was last deployed. Useful for tracking deployment history.Data Length: The size of the deployed program in bytes.Balance: The amount of SOL held in the program’s account to cover storage and execution fees.
Summary
This post offers a beginner-friendly introduction to building Solana programs using the Anchor framework, with a focus on creating a simple Vault program. It explains Solana’s unique programming model, where stateless on-chain programs handle logic, and persistent data is stored separately in accounts—an architecture that enhances scalability, efficiency, and flexibility. The tutorial walks through essential Solana account types such as Program Derived Addresses (PDAs), signer accounts, and system program accounts, while showcasing how Anchor streamlines development using type-safe validation and declarative constraints in the Accounts struct. Readers are guided through setting up their development environment, exploring the structure of an Anchor project, and writing Rust code to initialize and manage user vaults. With clear, step-by-step instructions for building, deploying, and verifying the program, this guide provides a solid foundation for developers looking to build secure and scalable decentralized applications on Solana.
What’s Next?
Now that you’ve built and deployed your first Solana program, it’s time to put it to the test.
In the next post, we’ll walk through how to test the Vault program using Anchor’s built-in testing framework. You’ll learn how to:
- Write integration tests in TypeScript
- Interact with your program from a local client
- Simulate deposits and withdrawals
- Assert expected outcomes and handle errors
Testing isn’t just about finding bugs — it’s a critical step toward writing robust, secure, and production-ready Solana programs. These skills will save you hours of debugging and give you confidence when deploying to mainnet.
By the end of the next guide, you’ll be comfortable writing automated tests that validate your program’s behavior and guard against unexpected edge cases.
This solid testing foundation will also prepare you for the exciting challenges ahead — from building frontends and integrating with wallets to developing more complex programs that handle real-world use cases.
🔧 Get ready to break (and fix) things — intentionally.
💡 Pro Tip: Want a head start? Take a look at the official Anchor testing docs before the next tutorial.
Stay tuned — we’re just getting started. The Vault program is only the beginning!